HttpInterceptor avoids passing beaer token each time
| Create Date: March 29, 2021 at 03:38 AM | Tag: JWT | Author Name: Sun, Charles |
HttpInterceptor benefits:
- don’t need to pass beaer token each time.
- don’t need to write lots of code.
- intercepts each http call and adds authorization header. Note that, all calls have the header added automatically.
import { Injectable, NgModule } from '@angular/core';
import { Observable } from 'rxjs';
import { HttpEvent, HttpInterceptor, HttpHandler, HttpRequest } from '@angular/common/http';
import { HTTP_INTERCEPTORS } from '@angular/common/http';
//import { HasClaimDirective } from './has-claim.directive';

@Injectable({
  providedIn: 'root'
})
export class HttpRequestInterceptor implements HttpInterceptor {
  intercept(req: HttpRequest<any>, next: HttpHandler):
    Observable<HttpEvent<any>> {
    var token = localStorage.getItem("bearerToken");

    if(token) {
      const newReq = req.clone(
        {
           headers: req.headers.set('Authorization',
                    'Bearer ' + token)
        });

        return next.handle(newReq);
    }
    else {
      return next.handle(req);
    }
  }
};


@NgModule({
  providers: [
    { provide: HTTP_INTERCEPTORS,
      useClass: HttpRequestInterceptor,
      multi: true }
  ],
  //declarations: [HasClaimDirective]
})
export class HttpInterceptorModule { }
New Comment
Useful links for authentication with C#
| Create Date: March 13, 2021 at 10:06 PM | Tag: SECURITY | Author Name: Sun, Charles |
ASP.NET Core and API access
In the previous quickstarts we explored both API access and user authentication. Now we want to bring the two parts together.
The beauty of the OpenID Connect & OAuth 2.0 combination is, that you can achieve both with a single protocol and a single exchange with the token service.
So far we only asked for identity resources during the token request, once we start also including API resources, IdentityServer will return two tokens: the identity token containing the information about the authentication and session, and the access token to access APIs on behalf of the logged on user.
Modifying the client configuration
Updating the client configuration in IdentityServer is straightforward - we simply need to add the api1 resource to the allowed scopes list. In addition we enable support for refresh tokens via the AllowOfflineAccess property:
new Client
{
    ClientId = "mvc",
    ClientSecrets = { new Secret("secret".Sha256()) },

    AllowedGrantTypes = GrantTypes.Code,

    // where to redirect to after login
    RedirectUris = { "https://localhost:5002/signin-oidc" },

    // where to redirect to after logout
    PostLogoutRedirectUris = { "https://localhost:5002/signout-callback-oidc" },

    AllowOfflineAccess = true,

    AllowedScopes = new List<string>
    {
        IdentityServerConstants.StandardScopes.OpenId,
        IdentityServerConstants.StandardScopes.Profile,
        "api1"
    }
}
Modifying the MVC client
All that’s left to do now in the client is to ask for the additional resources via the scope parameter. This is done in the OpenID Connect handler configuration:
services.AddAuthentication(options =>
{
    options.DefaultScheme = "Cookies";
    options.DefaultChallengeScheme = "oidc";
})
    .AddCookie("Cookies")
    .AddOpenIdConnect("oidc", options =>
    {
        options.Authority = "https://localhost:5001";

        options.ClientId = "mvc";
        options.ClientSecret = "secret";
        options.ResponseType = "code";

        options.SaveTokens = true;

        options.Scope.Add("api1");
        options.Scope.Add("offline_access");
    });
Since SaveTokens is enabled, ASP.NET Core will automatically store the resulting access and refresh token in the authentication session. You should be able to inspect the data on the page that prints out the contents of the session that you created earlier.
Using the access token
You can access the tokens in the session using the standard ASP.NET Core extension methods that you can find in the Microsoft.AspNetCore.Authentication namespace:
var accessToken = await HttpContext.GetTokenAsync("access_token");
For accessing the API using the access token, all you need to do is retrieve the token, and set it on your HttpClient:
public async Task<IActionResult> CallApi()
{
    var accessToken = await HttpContext.GetTokenAsync("access_token");

    var client = new HttpClient();
    client.DefaultRequestHeaders.Authorization = new AuthenticationHeaderValue("Bearer", accessToken);
    var content = await client.GetStringAsync("https://localhost:6001/identity");

    ViewBag.Json = JArray.Parse(content).ToString();
    return View("json");
}
Create a view called json.cshtml that outputs the json like this:
<pre>@ViewBag.Json</pre>
Make sure the API is running, start the MVC client and call /home/CallApi after authentication.
Managing the access token
By far the most complex task for a typical client is to manage the access token. You typically want to
- request the access and refresh token at login time
- cache those tokens
- use the access token to call APIs until it expires
- use the refresh token to get a new access token
- start over
ASP.NET Core has many built-in facility that can help you with those tasks (like caching or sessions), but there is still quite some work left to do. Feel free to have a look at this library, which can automate many of the boilerplate tasks.
How to get access token from HttpContext in .Net core 2.0
Startup.cs ConfigureServices
I wouldn't be surprised if it was something in the startup as there were a lot of breaking changes here as well.
services.Configure<ServiceSettings>(Configuration.GetSection("ServiceSettings"));
//services.TryAddSingleton<HttpContext, HttpContext>();
services.TryAddSingleton<IHttpContextAccessor, HttpContextAccessor>();
services.AddMvc();
services.AddAuthentication(options =>
            {

                options.DefaultScheme = CookieAuthenticationDefaults.AuthenticationScheme;
                options.DefaultChallengeScheme = OpenIdConnectDefaults.AuthenticationScheme;
            })
            .AddCookie()
            .AddOpenIdConnect(options =>
            {
                options.Authority = "http://localhost:5000";
                options.ClientId = "testclient";
                options.ClientSecret = "secret";
                options.ResponseType = "code id_token";
                options.RequireHttpsMetadata = false;
                options.GetClaimsFromUserInfoEndpoint = true;
            });
Startup.cs Configure
loggerFactory.AddDebug();

        if (env.IsDevelopment())
        {
            app.UseDeveloperExceptionPage();
            app.UseBrowserLink();
        }
        else
        {
            app.UseExceptionHandler("/Home/Error");
        }

        JwtSecurityTokenHandler.DefaultInboundClaimTypeMap.Clear();

        app.UseStaticFiles();
        app.UseAuthentication();

        app.UseMvc(routes =>
        {
            routes.MapRoute(
                name: "default",
                template: "{controller=Home}/{action=Index}/{id?}");
        });
Unable to find DiscoveryClient for IdentityServer4
Able to figure out, change in IdentityModel, its all extension of HttpClient.
https://identitymodel.readthedocs.io/en/latest/client/discovery.html
var client = new HttpClient();

var disco = await client.GetDiscoveryDocumentAsync("https://demo.identityserver.io");
Token Endpoint – IdentityModel
The RequestRefreshToken extension method has convenience properties for the refresh_token grant type:
var client = new HttpClient();
var response = await client.RequestRefreshTokenAsync(new RefreshTokenRequest
{
    Address = TokenEndpoint,

    ClientId = "client",
    ClientSecret = "secret",

    RefreshToken = "xyz"
});
Get AuthenticationInfo in ASP.NET Core 2.0
IdentityServer 4: Invalid grant type for client: authorization_code
I have figured it out. The GrantType I have mentioned in Database is wrong.
I was writing following code when getting clients from memory. i.e. from appsettings.json file
 new Client
 {
     -------
     -------
     AllowedGrantTypes = GrantTypes.Code,
     --------
     --------
}
And later when I have moved this information to database, I mistakenly used the same grantType i.e. Code, which is wrong. It should be defined like authorization_code.
So by changing GrantType in database from Code to authorization_code. fixed my issue.
How to configure IdentityServer4 for .NET application
| Create Date: March 08, 2021 at 04:35 AM | Tag: SECURITY | Author Name: Sun, Charles |
For .Dotnet 5, the setup is tricky.
- migrate in-memory to sql server by using below command.
dotnet ef migrations add InitialIdentityServerPersistedGrantDbMigration -c PersistedGrantDbContest -o Data/Migration/IndetityServer/PersistedGrantDb
Note that, the .csproj needs the statement below.(Installing nuget directly is not working).
  <ItemGroup>
    <DotNetCliToolReference Include="Microsoft.EntityFrameworkCore.Tools.DotNet" Version="2.0.3" />
  </ItemGroup>
Then run to check.
dotnet ef
- configure several classes:
using System;
using System.Collections.Generic;
using System.Data;
using System.Data.SqlClient;
using System.Linq;
using System.Reflection;
using System.Security.Cryptography.X509Certificates;
using System.Threading.Tasks;
using IdentityServer4.EntityFramework.DbContexts;
using IdentityServer4.EntityFramework.Mappers;
using Microsoft.AspNetCore.Builder;
using Microsoft.AspNetCore.Hosting;
using Microsoft.AspNetCore.HttpsPolicy;
using Microsoft.EntityFrameworkCore;
using Microsoft.Extensions.Configuration;
using Microsoft.Extensions.DependencyInjection;
using Microsoft.Extensions.Hosting;
using MyWeb.Data.Repositories;
using MyWeb.OAuth.Configuration;

namespace MyWeb.OAuth
{
    public class Startup
    {
        public Startup(IConfiguration configuration)
        {
            Configuration = configuration;
        }

        public IConfiguration Configuration { get; }

        // This method gets called by the runtime. Use this method to add services to the container.
        public void ConfigureServices(IServiceCollection services)
        {
            services.AddTransient<IUserValidator, UserValidator>();
            services.AddTransient<IUserRepository, UserRepository>();
            services.AddSingleton<Func<IDbConnection>>(() => new SqlConnection(Configuration.GetValue<string>("ConnectionStrings:MyWeb")));

            var assembly = typeof(Startup).GetTypeInfo().Assembly.GetName().Name;
            services.AddIdentityServer()
                .AddSigningCredential(new X509Certificate2(@"D:\C#\MyWeb\MyWeb\cert.pfx", "password"))
                .AddResourceOwnerValidator<ResourceOwnerPasswordValidator>()
                .AddConfigurationStore(options => options.ConfigureDbContext = builder =>
                    builder.UseSqlServer(Configuration.GetValue<string>("ConnectionStrings:MyWebAuth"), sql => sql.MigrationsAssembly(assembly)))
                .AddOperationalStore(options => options.ConfigureDbContext = builder =>
                    builder.UseSqlServer(Configuration.GetValue<string>("ConnectionStrings:MyWebAuth"), sql => sql.MigrationsAssembly(assembly)));

            services.AddControllersWithViews();
        }

        // This method gets called by the runtime. Use this method to configure the HTTP request pipeline.
        public void Configure(IApplicationBuilder app, IWebHostEnvironment env)
        {
            if (env.IsDevelopment())
            {
                app.UseDeveloperExceptionPage();
            }
            else
            {
                app.UseExceptionHandler("/Quickstart/Home/Error");
                // The default HSTS value is 30 days. You may want to change this for production scenarios, see https://aka.ms/aspnetcore-hsts.
                app.UseHsts();
            }
            //MigrateInMemoryDataToSqlServer(app);
            app.UseHttpsRedirection();
            app.UseStaticFiles();

            app.UseRouting();

            app.UseIdentityServer();

            app.UseAuthorization();

            app.UseEndpoints(endpoints =>
            {
                endpoints.MapControllerRoute(
                    name: "default",
                    pattern: "{controller=Home}/{action=Index}/{id?}");
            });
        }
        public void MigrateInMemoryDataToSqlServer(IApplicationBuilder app)
        {
            using (var scope = app.ApplicationServices.GetService<IServiceScopeFactory>().CreateScope())
            {
                scope.ServiceProvider.GetRequiredService<PersistedGrantDbContext>().Database.Migrate();

                var context = scope.ServiceProvider.GetRequiredService<ConfigurationDbContext>();

                context.Database.Migrate();

                if (!context.Clients.Any())
                {
                    foreach (var client in InMemoryConfiguration.Clients())
                    {
                        context.Clients.Add(client.ToEntity());
                    }

                    context.SaveChanges();
                }


                if (!context.ApiResources.Any())
                {
                    foreach (var resource in InMemoryConfiguration.ApiResources())
                    {
                        context.ApiResources.Add(resource.ToEntity());
                    }

                    context.SaveChanges();
                }
            }
        }
    }
}
using MyWeb.Data.Model; using MyWeb.Data.Repositories; using MyWeb.OAuth.Helpers; using System; using System.Collections.Generic; using System.Linq; using System.Security.Claims; using System.Threading.Tasks; namespace MyWeb.OAuth.Configuration { public class UserValidator : IUserValidator { private IUserRepository repository; public UserValidator(IUserRepository repository) { this.repository = repository; } public Task<User> AutoProvisionUserAsync(string provider, string userId, IEnumerable<Claim> claims) { throw new NotImplementedException(); } public Task<User> FindByExternalProviderAsync(string provider, string userId) { throw new NotImplementedException(); } public Task<User> FindByUsernameAsync(string username) { return repository.GetAsync(username); } public async Task<bool> ValidateCredentialsAsync(string username, string password) { var user = await repository.GetAsync(username, HashHelper.Sha512(password + username)); return user != null; } } public interface IUserValidator { Task<bool> ValidateCredentialsAsync(string username, string password); Task<User> FindByUsernameAsync(string username); Task<User> FindByExternalProviderAsync(string provider, string userId); Task<User> AutoProvisionUserAsync(string provider, string userId, IEnumerable<Claim> claims); } }// Copyright (c) Brock Allen & Dominick Baier. All rights reserved. // Licensed under the Apache License, Version 2.0. See LICENSE in the project root for license information. using IdentityModel; using IdentityServer4; using IdentityServer4.Events; using IdentityServer4.Extensions; using IdentityServer4.Models; using IdentityServer4.Services; using IdentityServer4.Stores; using IdentityServer4.Test; using Microsoft.AspNetCore.Authentication; using Microsoft.AspNetCore.Authorization; using Microsoft.AspNetCore.Http; using Microsoft.AspNetCore.Identity; using Microsoft.AspNetCore.Mvc; using MyWeb.OAuth.Configuration; using System; using System.Linq; using System.Threading.Tasks; namespace IdentityServerHost.Quickstart.UI { /// <summary> /// This sample controller implements a typical login/logout/provision workflow for local and external accounts. /// The login service encapsulates the interactions with the user data store. This data store is in-memory only and cannot be used for production! /// The interaction service provides a way for the UI to communicate with identityserver for validation and context retrieval /// </summary> [SecurityHeaders] [AllowAnonymous] public class AccountController : Controller { //private readonly TestUserStore _users; private readonly IIdentityServerInteractionService _interaction; private readonly IClientStore _clientStore; private readonly IAuthenticationSchemeProvider _schemeProvider; private readonly IEventService _events; private readonly IUserValidator userValidator; public AccountController( IIdentityServerInteractionService interaction, IClientStore clientStore, IAuthenticationSchemeProvider schemeProvider, IEventService events, IUserValidator userValidator) { // if the TestUserStore is not in DI, then we'll just use the global users collection // this is where you would plug in your own custom identity management library (e.g. ASP.NET Identity) // _users = users ?? new TestUserStore(TestUsers.Users); _interaction = interaction; _clientStore = clientStore; _schemeProvider = schemeProvider; _events = events; this.userValidator = userValidator; } /// <summary> /// Entry point into the login workflow /// </summary> [HttpGet] public async Task<IActionResult> Login(string returnUrl) { // build a model so we know what to show on the login page var vm = await BuildLoginViewModelAsync(returnUrl); if (vm.IsExternalLoginOnly) { // we only have one option for logging in and it's an external provider return RedirectToAction("Challenge", "External", new { scheme = vm.ExternalLoginScheme, returnUrl }); } return View(vm); } /// <summary> /// Handle postback from username/password login /// </summary> [HttpPost] [ValidateAntiForgeryToken] public async Task<IActionResult> Login(LoginInputModel model, string button) { // check if we are in the context of an authorization request var context = await _interaction.GetAuthorizationContextAsync(model.ReturnUrl); // the user clicked the "cancel" button if (button != "login") { if (context != null) { // if the user cancels, send a result back into IdentityServer as if they // denied the consent (even if this client does not require consent). // this will send back an access denied OIDC error response to the client. await _interaction.DenyAuthorizationAsync(context, AuthorizationError.AccessDenied); // we can trust model.ReturnUrl since GetAuthorizationContextAsync returned non-null if (context.IsNativeClient()) { // The client is native, so this change in how to // return the response is for better UX for the end user. return this.LoadingPage("Redirect", model.ReturnUrl); } return Redirect(model.ReturnUrl); } else { // since we don't have a valid context, then we just go back to the home page return Redirect("~/"); } } if (ModelState.IsValid) { // validate username/password against in-memory store if (await userValidator.ValidateCredentialsAsync(model.Username, model.Password)) { var user = await userValidator.FindByUsernameAsync(model.Username); await _events.RaiseAsync(new UserLoginSuccessEvent(user.Username, user.Id.ToString(), user.Username, clientId: context?.Client.ClientId)); // only set explicit expiration here if user chooses "remember me". // otherwise we rely upon expiration configured in cookie middleware. AuthenticationProperties props = null; if (AccountOptions.AllowRememberLogin && model.RememberLogin) { props = new AuthenticationProperties { IsPersistent = true, ExpiresUtc = DateTimeOffset.UtcNow.Add(AccountOptions.RememberMeLoginDuration) }; }; // issue authentication cookie with subject ID and username var isuser = new IdentityServerUser(user.Id.ToString()) { DisplayName = user.Username }; await HttpContext.SignInAsync(isuser, props); if (context != null) { if (context.IsNativeClient()) { // The client is native, so this change in how to // return the response is for better UX for the end user. return this.LoadingPage("Redirect", model.ReturnUrl); } // we can trust model.ReturnUrl since GetAuthorizationContextAsync returned non-null return Redirect(model.ReturnUrl); } // request for a local page if (Url.IsLocalUrl(model.ReturnUrl)) { return Redirect(model.ReturnUrl); } else if (string.IsNullOrEmpty(model.ReturnUrl)) { return Redirect("~/"); } else { // user might have clicked on a malicious link - should be logged throw new Exception("invalid return URL"); } } await _events.RaiseAsync(new UserLoginFailureEvent(model.Username, "invalid credentials", clientId:context?.Client.ClientId)); ModelState.AddModelError(string.Empty, AccountOptions.InvalidCredentialsErrorMessage); } // something went wrong, show form with error var vm = await BuildLoginViewModelAsync(model); return View(vm); } /// <summary> /// Show logout page /// </summary> [HttpGet] public async Task<IActionResult> Logout(string logoutId) { // build a model so the logout page knows what to display var vm = await BuildLogoutViewModelAsync(logoutId); if (vm.ShowLogoutPrompt == false) { // if the request for logout was properly authenticated from IdentityServer, then // we don't need to show the prompt and can just log the user out directly. return await Logout(vm); } return View(vm); } /// <summary> /// Handle logout page postback /// </summary> [HttpPost] [ValidateAntiForgeryToken] public async Task<IActionResult> Logout(LogoutInputModel model) { // build a model so the logged out page knows what to display var vm = await BuildLoggedOutViewModelAsync(model.LogoutId); if (User?.Identity.IsAuthenticated == true) { // delete local authentication cookie await HttpContext.SignOutAsync(); // raise the logout event await _events.RaiseAsync(new UserLogoutSuccessEvent(User.GetSubjectId(), User.GetDisplayName())); } // check if we need to trigger sign-out at an upstream identity provider if (vm.TriggerExternalSignout) { // build a return URL so the upstream provider will redirect back // to us after the user has logged out. this allows us to then // complete our single sign-out processing. string url = Url.Action("Logout", new { logoutId = vm.LogoutId }); // this triggers a redirect to the external provider for sign-out return SignOut(new AuthenticationProperties { RedirectUri = url }, vm.ExternalAuthenticationScheme); } return View("LoggedOut", vm); } [HttpGet] public IActionResult AccessDenied() { return View(); } /*****************************************/ /* helper APIs for the AccountController */ /*****************************************/ private async Task<LoginViewModel> BuildLoginViewModelAsync(string returnUrl) { var context = await _interaction.GetAuthorizationContextAsync(returnUrl); if (context?.IdP != null && await _schemeProvider.GetSchemeAsync(context.IdP) != null) { var local = context.IdP == IdentityServer4.IdentityServerConstants.LocalIdentityProvider; // this is meant to short circuit the UI and only trigger the one external IdP var vm = new LoginViewModel { EnableLocalLogin = local, ReturnUrl = returnUrl, Username = context?.LoginHint, }; if (!local) { vm.ExternalProviders = new[] { new ExternalProvider { AuthenticationScheme = context.IdP } }; } return vm; } var schemes = await _schemeProvider.GetAllSchemesAsync(); var providers = schemes .Where(x => x.DisplayName != null) .Select(x => new ExternalProvider { DisplayName = x.DisplayName ?? x.Name, AuthenticationScheme = x.Name }).ToList(); var allowLocal = true; if (context?.Client.ClientId != null) { var client = await _clientStore.FindEnabledClientByIdAsync(context.Client.ClientId); if (client != null) { allowLocal = client.EnableLocalLogin; if (client.IdentityProviderRestrictions != null && client.IdentityProviderRestrictions.Any()) { providers = providers.Where(provider => client.IdentityProviderRestrictions.Contains(provider.AuthenticationScheme)).ToList(); } } } return new LoginViewModel { AllowRememberLogin = AccountOptions.AllowRememberLogin, EnableLocalLogin = allowLocal && AccountOptions.AllowLocalLogin, ReturnUrl = returnUrl, Username = context?.LoginHint, ExternalProviders = providers.ToArray() }; } private async Task<LoginViewModel> BuildLoginViewModelAsync(LoginInputModel model) { var vm = await BuildLoginViewModelAsync(model.ReturnUrl); vm.Username = model.Username; vm.RememberLogin = model.RememberLogin; return vm; } private async Task<LogoutViewModel> BuildLogoutViewModelAsync(string logoutId) { var vm = new LogoutViewModel { LogoutId = logoutId, ShowLogoutPrompt = AccountOptions.ShowLogoutPrompt }; if (User?.Identity.IsAuthenticated != true) { // if the user is not authenticated, then just show logged out page vm.ShowLogoutPrompt = false; return vm; } var context = await _interaction.GetLogoutContextAsync(logoutId); if (context?.ShowSignoutPrompt == false) { // it's safe to automatically sign-out vm.ShowLogoutPrompt = false; return vm; } // show the logout prompt. this prevents attacks where the user // is automatically signed out by another malicious web page. return vm; } private async Task<LoggedOutViewModel> BuildLoggedOutViewModelAsync(string logoutId) { // get context information (client name, post logout redirect URI and iframe for federated signout) var logout = await _interaction.GetLogoutContextAsync(logoutId); var vm = new LoggedOutViewModel { AutomaticRedirectAfterSignOut = AccountOptions.AutomaticRedirectAfterSignOut, PostLogoutRedirectUri = logout?.PostLogoutRedirectUri, ClientName = string.IsNullOrEmpty(logout?.ClientName) ? logout?.ClientId : logout?.ClientName, SignOutIframeUrl = logout?.SignOutIFrameUrl, LogoutId = logoutId }; if (User?.Identity.IsAuthenticated == true) { var idp = User.FindFirst(JwtClaimTypes.IdentityProvider)?.Value; if (idp != null && idp != IdentityServer4.IdentityServerConstants.LocalIdentityProvider) { var providerSupportsSignout = await HttpContext.GetSchemeSupportsSignOutAsync(idp); if (providerSupportsSignout) { if (vm.LogoutId == null) { // if there's no current logout context, we need to create one // this captures necessary info from the current logged in user // before we signout and redirect away to the external IdP for signout vm.LogoutId = await _interaction.CreateLogoutContextAsync(); } vm.ExternalAuthenticationScheme = idp; } } } return vm; } } }
How to configure IdentityServer4 to use EntityFramework Core with SQL Server as the storage mechanism
In this short walk-through I’ll show you how to move IdentityServer4’s configuration data (resources and clients) and operational data (tokens, codes, and consents) into a database in QuickApp. QuickApp uses the in-memory implementations of these and you have the option to move these data into a persistent store such as a db using EntityFramework Core.
This gets rid of the notification during build: “You are using the in-memory version of the persisted grant store. This will store consent decisions, authorization codes, refresh and reference tokens in memory only. If you are using any of those features in production, you want to switch to a different store implementation.”
QuickApp is a clean, easy-to-use, responsive Asp.net core/AngularX project template that has common application features such as login, user management, role management, etc. fully implemented for Rapid Application Development.
QuickApp is available for free on GitHub for both commercial and private use: https://github.com/emonney/quickapp
See this guide on readthedocs.io for more info on this topic.
- We start by adding IdentityServer4.EntityFramework Nuget package to our QuickApp project

- Then we head over to Startup.cs and from the
ConfigureServices()
method we’ll reconfigure IdentityServer to use Sql Server to save its data.
We change the lines below:// Adds IdentityServer.
services.AddIdentityServer()
// The AddDeveloperSigningCredential extension creates temporary key material for signing tokens.
// This might be useful to get started, but needs to be replaced by some persistent key material for production scenarios.
// See http://docs.identityserver.io/en/release/topics/crypto.html#refcrypto for more information.
.AddDeveloperSigningCredential()
.AddInMemoryPersistedGrants()
// To configure IdentityServer to use EntityFramework (EF) as the storage mechanism for configuration data (rather than using the in-memory implementations),
// see https://identityserver4.readthedocs.io/en/release/quickstarts/8_entity_framework.html
.AddInMemoryIdentityResources(IdentityServerConfig.GetIdentityResources())
.AddInMemoryApiResources(IdentityServerConfig.GetApiResources())
.AddInMemoryClients(IdentityServerConfig.GetClients())
.AddAspNetIdentity<ApplicationUser>()
.AddProfileService<ProfileService>();
To this:
// Adds IdentityServer.
services.AddIdentityServer()
// The AddDeveloperSigningCredential extension creates temporary key material for signing tokens.
// This might be useful to get started, but needs to be replaced by some persistent key material for production scenarios.
// See http://docs.identityserver.io/en/release/topics/crypto.html#refcrypto for more information.
.AddDeveloperSigningCredential()
.AddConfigurationStore(options =>
{
options.ConfigureDbContext = builder => builder.UseSqlServer(connectionString, sql => sql.MigrationsAssembly(migrationsAssembly));
})
.AddOperationalStore(options =>
{
options.ConfigureDbContext = builder => builder.UseSqlServer(connectionString, sql => sql.MigrationsAssembly(migrationsAssembly));
// this enables automatic token cleanup. this is optional.
options.EnableTokenCleanup = true;
options.TokenCleanupInterval = 30;
})
.AddAspNetIdentity<ApplicationUser>()
.AddProfileService<ProfileService>();
This modification configures IdentityServer to use an SQL database and we pass in the connection string of the database we want to use. In this case we use the existing database in the project.
- Now we can add a new EntityFramework migrations to add IdentityServer’s tables to our database. We do this from the command line at the web project’s root:
dotnet ef migrations add InitialIdentityServerPersistedGrantDbMigration -c PersistedGrantDbContext -o Migrations/IdentityServer/PersistedGrantDb
dotnet ef migrations add InitialIdentityServerConfigurationDbMigration -c ConfigurationDbContext -o Migrations/IdentityServer/ConfigurationDb
- Now that we have the migrations for the two stores in place, let’s write some code to apply these migrations at application startup and also seed the file based configurations into the database.
Rather than creating another DatabaseInitializer class to seed our db with IdentityServer’s configurations I’ll simply inherit from the existingDatabaseInitializer
class.
The completeIdentityServerDBInitializer
class looks like this:// ====================================
// info@ebenmonney.com
// www.ebenmonney.com/quickapp-standard
// ====================================
using DAL.Models;
using Microsoft.AspNetCore.Identity;
using Microsoft.EntityFrameworkCore;
using Microsoft.Extensions.Logging;
using System;
using System.Collections.Generic;
using System.Linq;
using System.Text;
using System.Threading.Tasks;
using DAL.Core;
using DAL.Core.Interfaces;
using IdentityServer4.EntityFramework.DbContexts;
using DAL;
using IdentityServer4.EntityFramework.Mappers;
namespace QuickApp.Standard
{
public class IdentityServerDbInitializer : DatabaseInitializer
{
private readonly PersistedGrantDbContext _persistedGrantContext;
private readonly ConfigurationDbContext _configurationContext;
private readonly ILogger _logger;
public IdentityServerDbInitializer(
ApplicationDbContext context,
PersistedGrantDbContext persistedGrantContext,
ConfigurationDbContext configurationContext,
IAccountManager accountManager,
ILogger<IdentityServerDbInitializer> logger) : base(context, accountManager, logger)
{
_persistedGrantContext = persistedGrantContext;
_configurationContext = configurationContext;
_logger = logger;
}
override public async Task SeedAsync()
{
await base.SeedAsync().ConfigureAwait(false);
await _persistedGrantContext.Database.MigrateAsync().ConfigureAwait(false);
await _configurationContext.Database.MigrateAsync().ConfigureAwait(false);
if (!await _configurationContext.Clients.AnyAsync())
{
_logger.LogInformation("Seeding IdentityServer Clients");
foreach (var client in IdentityServerConfig.GetClients())
{
_configurationContext.Clients.Add(client.ToEntity());
}
_configurationContext.SaveChanges();
}
if (!await _configurationContext.IdentityResources.AnyAsync())
{
_logger.LogInformation("Seeding IdentityServer Identity Resources");
foreach (var resource in IdentityServerConfig.GetIdentityResources())
{
_configurationContext.IdentityResources.Add(resource.ToEntity());
}
_configurationContext.SaveChanges();
}
if (!await _configurationContext.ApiResources.AnyAsync())
{
_logger.LogInformation("Seeding IdentityServer API Resources");
foreach (var resource in IdentityServerConfig.GetApiResources())
{
_configurationContext.ApiResources.Add(resource.ToEntity());
}
_configurationContext.SaveChanges();
}
}
}
}
Note that we use the override keyword for our
SeedAsync()
method. That means we have to add the virtual keyword to our base implementation in the file DatabaseInitializer.cs ( i.e.virtual public async Task SeedAsync()
).
Also we now have additional DbContexts in our solution (i.e. IdentityServer’s PersistedGrantDbContext and ConfigurationDbContext), so we need to modify the constructor of our own ApplicationDbContext class and restrict the parameter it can accept to the typeDbContextOptions<ApplicationDbContext>
, else dependency injection will pass in the wrongDbContextOptions
that belongs to one of the other DbContext.
We do this by changing the linepublic ApplicationDbContext(DbContextOptions options) : base(options)
topublic ApplicationDbContext(DbContextOptions<ApplicationDbContext> options) : base(options)
- Then finally from Startup.cs we tell Dependency Injection to use our new seeding class when creating instances of
IDatabaseInitializer
(IDatabaseInitializer is called from Program.cs’ main() method at application startup to initialize and seed the database).
I.e. we changeservices.AddTransient<IDatabaseInitializer, DatabaseInitializer>();
toservices.AddTransient<IDatabaseInitializer, IdentityServerDbInitializer>();
And that’s all we need to do to switch from an in-memory store to an EntityFramework Core store. You’ll find the completed project in a folder named “kitchen-sink” in the QuickApp Pro and QuickApp Standard download packages.
How To Use ASP.NET Identity And IdentityServer4 In Your Solution
Identity Management is an essential part of any solution. In this post, I will build an Identity Service by using IdentityServer4 and ASP.NET Identity together.
Any modern application contains many components: front-ends, back-ends, and third-party APIs. How should you implement authentication and authorization?
What Is ASP.NET Core Identity
ASP.NET Core Identity is a membership nuget package that can be used in any ASP.NET project Type: MVC, WebForms, WebAPI. It has the main following capabilities:
- Easily customize the user profile data.
- Storing the users’ info in a persistence data store using Entity Framework Code First.
- Unit testability
- Restrict access by roles
- Claims-based provider
You can also check this ASP.NET Core Identity demo.
So ASP.NET Identity is Authentication and Authorization provider. Why do we need IdentityServer4?
ASP.NET Identity can receive a security token from a third-party login provider like Facebook, Google, Microsoft and Twitter. But If you want to issue a security token for a local ASP.NET Identity user you need to work with a third-party library like IdentityServer4, OpenIddict.
If you do a little research, you will find IdentityServer4 is the most common.
What Is IdentityServer4
IdentityServer4 is an OpenID Connect and OAuth 2.0 Framework for ASP.NET Core. It is a nuget package that is used in the asp.net core middleware to enable using the login/logout, token/authorize and other standard protocol endpoints.
To have a good understanding of the architecture, I think you better review the main terminology that will be used during this post:
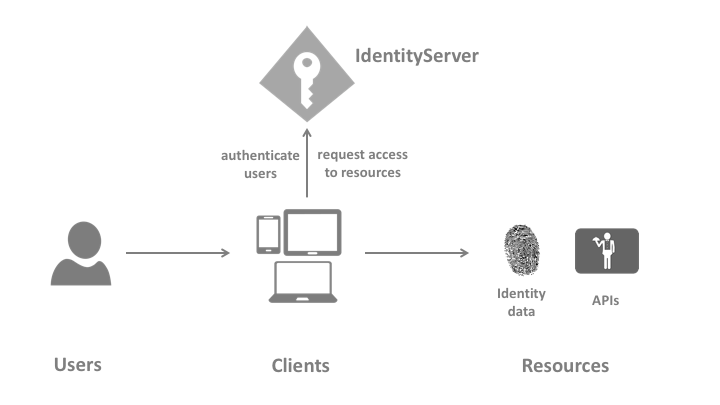
Image source: http://docs.identityserver.io/en/latest/intro/terminology.html
- User: a human (me and you) that is using a client
- Client: it’s the software like web-browser, mobile app and any code that requests a resource.
- Resources: what you want to protect using identityserver4
- Access Token: it is the token that is used by a client to access the API resource.
- Refresh Token: each access token has an expiry date. The refresh token is used to get a new access token without the user interaction. The client should be allowed to do that by setting AllowOfflineAccess to true in client configuration in IdentityServer4.
- Grant Type: it is the type of interaction between the client and the IdentityServer. based on your client you should choose the suitable grant type.
Building Identity Service
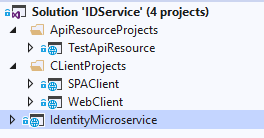
You can see the following steps in the IdentityServer4 docs for more details. The last output will be a visual studio 2019 solution that contains:
- IdentityMicroservice (IdentityServer4 and ASP.NET Identity)
- ClientsProjects\SPAClient (Single Page Application Client)
- ClientsProjects\WebClient (ASP.NET MVC Client)
- ApiResrouceProjects\TestApiResource (Represents a secured resource)
1- Identity MicroService Project Startup
This is the project that is responsible for securing APIs, configuring your clients and storing users’ data. You can see the source code on Github.
Here are the steps:
Create a new ASP.NET CORE Web Application (Empty) project.

Install IdentityServer4 Templates by executing the following command:
dotnet new -i IdentityServer4.Templates
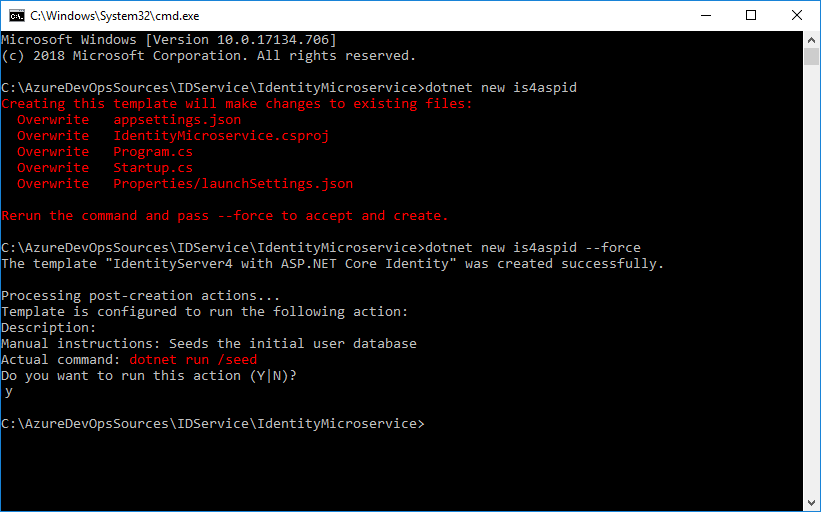
Add IdentityServer4 and its QuickStart UI Files along with ASP.NET Identity Nuget packages to the project by running the command:
dotnet new is4aspid --force
In .NET Core 2.2:
After running the command mentioned above, make sure to change the project to .NET 2.2 and update the Nuget packages, because executing the command will affect the .csproj file and might downgrade the .net core version, based on the IdentityServer4.Templates version.
You may need to update the following Nuget packages by modifying csproj file directly:
"Microsoft.VisualStudio.Web.CodeGeneration.Design" Version="2.2.3"
"Microsoft.EntityFrameworkCore.Tools" Version="2.2.4"
In .NET Core 3.1
After running the command mentioned above, make sure to change the project from .NET Core 3.0 to .Net Core 3.1 and update the IdentityServer4 Nuget packages from 3.0 to 3.1, because executing the command will affect the .csproj file and might downgrade the .net core version based on the IdentityServer4.Templates version.
You will update the following Nuget packages:
"Microsoft.EntityFrameworkCore.Tools" Version="3.1.0"
You need to remove “Microsoft.AspNetCore.App” nuget package because it’s not needed in .NET Core 3.1. This will cause error in ApplicationDbContext and Startup.cs because of missed Nuget packages so install:
- Microsoft.AspNetCore.Identity.EntityFrameworkCore 3.1.0
- Microsoft.AspNetCore.Diagnostics.EntityFrameworkCore 3.1.0
You will also get a warning message for IHostingEnvironment because this interface has a replacement in .NET Core 3.1 so you should use IWebHostEnvironment.
In ConfigureServices() in startup.cs file add this:
//services.AddMvc().SetCompatibilityVersion(Microsoft.AspNetCore.Mvc.CompatibilityVersion.Version_2_1);
services.AddControllersWithViews();
In Configure() in startup.cs file, you need to modify this:
app.UseRouting();
	    // Block 4:
            //  UseIdentityServer include a call to UseAuthentication
            app.UseIdentityServer();
            app.UseAuthorization();

            //app.UseMvcWithDefaultRoute();
            app.UseEndpoints(endpoints =>
            {
                endpoints.MapControllerRoute(
                    name: "default",
                    pattern: "{controller=Home}/{action=Index}/{id?}");
            });
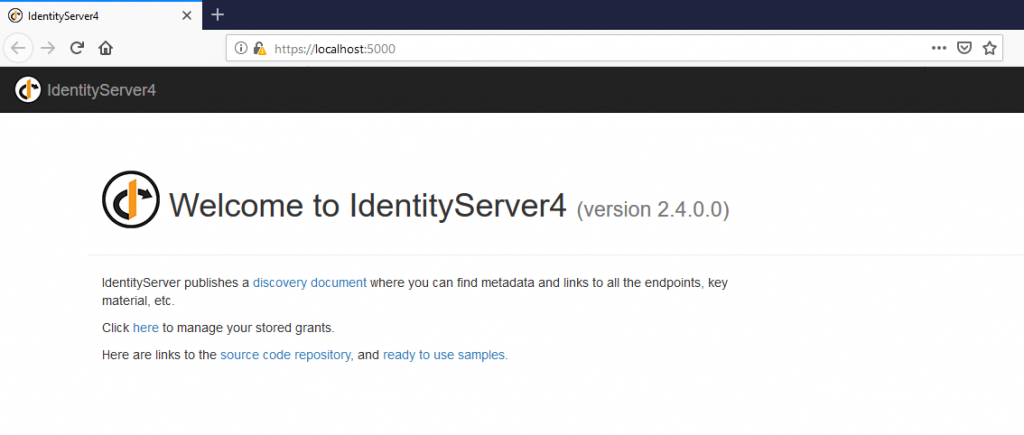
After that, you can build the project to make sure that it’s running.
2- Configuring Identity MicroService Project
The main files you should review and modify:
- Config.cs
- Startup.cs
Define your resources and clientS
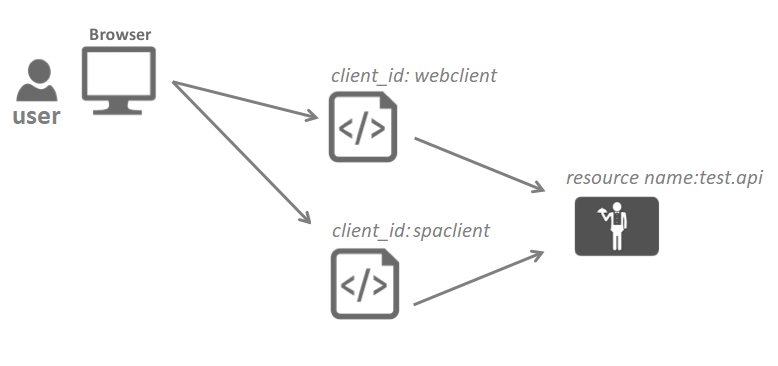
Image source: http://docs.identityserver.io/en/latest/intro/big_picture.html (modified version)
IdentityServer4 gives two options to configure. You can use the InMemory Configuration or Use Database storage. In this example, we will use InMemory for the sake of brevity.
In config.cs file you will define the API resources you want to protect and clients that the user will use to access its resources. this file will be used in the next step add the middleware in Startup.cs
In your real scenario project, you need to use the database configuration. IdentityServer4 has ready implementation for SQL Server using EntityFramework Core. In this sample, The Config.cs file will look like the following:
// Block 1: All APIs, I want to protect in my system
        public static IEnumerable GetApis()
        {
            return new ApiResource[]
            {
                new ApiResource("identity.api", "Identity API"),
                new ApiResource("test.api","Test API")
            };
        }

        public static IEnumerable GetClients()
        {
            return new[]
            {
                //Block 2:  MVC client using hybrid flow
                new Client
                {
                    ClientId = "webclient",
                    ClientName = "Web Client",
                    RequireConsent = false,
                    AllowedGrantTypes = GrantTypes.HybridAndClientCredentials,
                    ClientSecrets = { new Secret("49C1A7E1-0C79-4A89-A3D6-A37998FB86B0".Sha256()) },

                    RedirectUris = { "https://localhost:5002/signin-oidc" },
                    FrontChannelLogoutUri = "https://localhost:5002/signout-oidc",
                    PostLogoutRedirectUris = { "https://localhost:5002/signout-callback-oidc" },

                    AllowOfflineAccess = true,
                    AllowedScopes = { "openid", "profile", "identity.api","test.api" }
                },

                //Block 3: SPA client using Code flow
                new Client
                {
                    ClientId = "spaclient",
                    ClientName = "SPA Client",
                    ClientUri = "https://localhost:5003",
                    RequireConsent = false,
                    AllowedGrantTypes = GrantTypes.Code,
                    RequirePkce = true,
                    RequireClientSecret = false,
                    AllowAccessTokensViaBrowser = true,

                    RedirectUris =
                    {
                        "https://localhost:5003/index.html",
                        "https://localhost:5003/callback.html"
                    },

                    PostLogoutRedirectUris = { "https://localhost:5003/index.html" },
                    AllowedCorsOrigins = { "https://localhost:5003" },

                    AllowedScopes = { "openid", "profile", "identity.api" ,"test.api" }
                }
            };
        }
Add IdentityServer4 and Asp.NET identity to middleware
Startup.cs class is called in the run time when the app starts. It has two methods. ConfigureServices() which register the services in DI container to be used in the applications. Configure() which configure the request’s processing pipeline.
        public void ConfigureServices(IServiceCollection services)
        {
            //TODO: change UseSqlite to UseSqlServer
            services.AddDbContext(options =>            options.UseSqlite(Configuration.GetConnectionString("DefaultConnection")));
            // Block 1: Add ASP.NET Identity
            services.AddIdentity()
                .AddEntityFrameworkStores()
                .AddDefaultTokenProviders();

            // Block 2: Add IdentityServer4 with InMemory Configuration
            var builder = services.AddIdentityServer(options =>
            {
                options.Events.RaiseErrorEvents = true;
                options.Events.RaiseInformationEvents = true;
                options.Events.RaiseFailureEvents = true;
                options.Events.RaiseSuccessEvents = true;
            })
                .AddInMemoryIdentityResources(Config.GetIdentityResources())
                .AddInMemoryApiResources(Config.GetApis())
                .AddInMemoryClients(Config.GetClients())
                .AddAspNetIdentity();
//some code is not mentioend here for the sake of brevity
            services.AddAuthentication();
        }

        public void Configure(IApplicationBuilder app)
        {
            if (Environment.EnvironmentName == "Development")
            {
                app.UseDeveloperExceptionPage();
                app.UseDatabaseErrorPage();
            }
            else
            {
                app.UseExceptionHandler("/Home/Error");
            }

            app.UseStaticFiles();
            app.UseRouting();
            // Block 4:
            //  UseIdentityServer include a call to UseAuthentication
            app.UseIdentityServer();
            app.UseAuthorization();

            //app.UseMvcWithDefaultRoute();
            app.UseEndpoints(endpoints =>
            {
                endpoints.MapControllerRoute(
                    name: "default",
                    pattern: "{controller=Home}/{action=Index}/{id?}");
            });
        }
After configuring the Identity service project, let’s move to API and Clients project configuration
3- Configuring Web Client Project
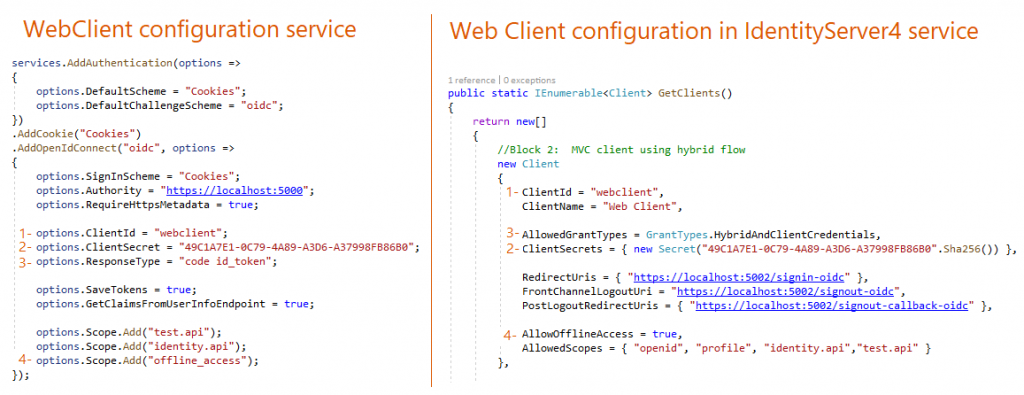
As you see on the left side of the image above, you can configure using OpenIdConnect by providing the client information that is already stored in Identity service.
Authority is the public link of the Identity Service. The Grant type is hybrid which represents both implicit and authorization code flow both. It is recommended grant type for server-side web application and mobile native application.
4- Configuring Single Page Application Project
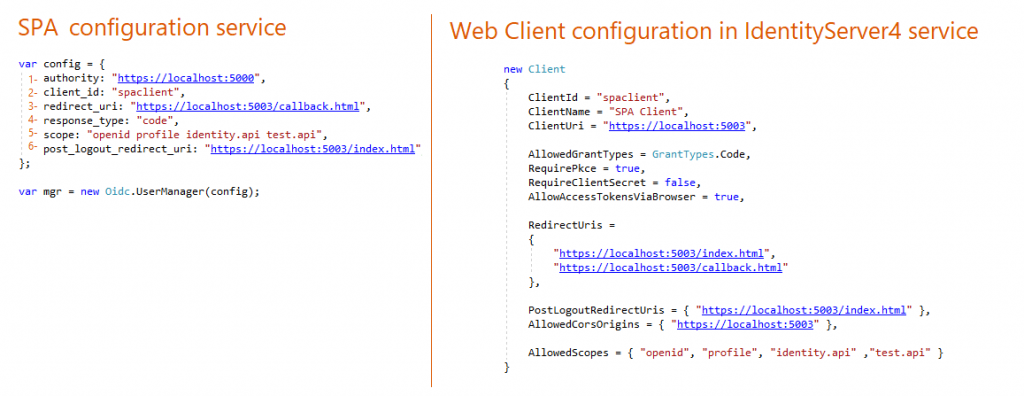
SPA is a client-side app. So we need first to install OpenIdConnect javascript library then include the file in the HTML page.
The Grant Type is authorization-code with PKCE. The detailed documentation is here
5- Configuring Test API Resource Project
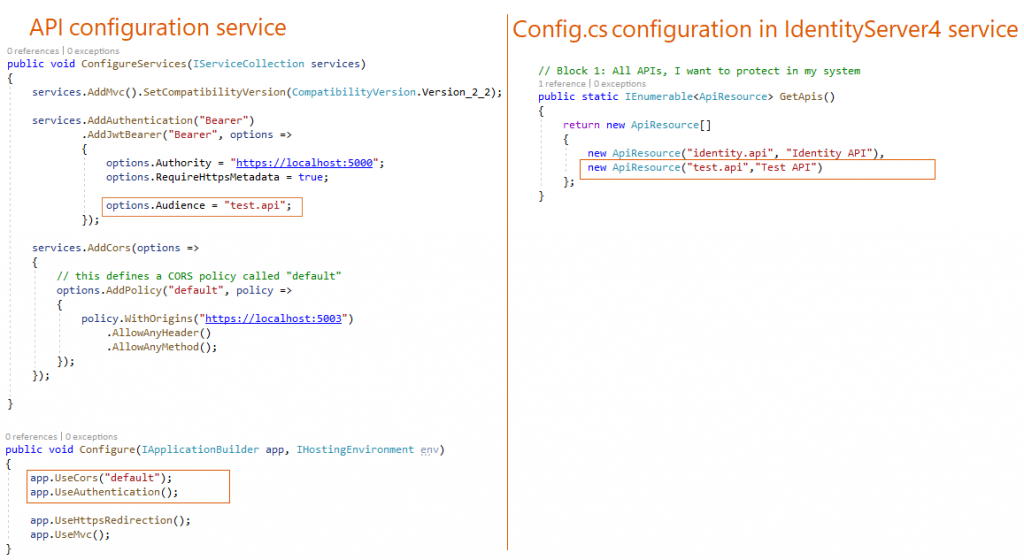
On the right side, I defined the API resource in the IdentityServer4 by a unique name and a label.
on the left side, I added the auth configuration to API resource startup class. Then I enabled the CORS to allow clients to make a call to the API.
In the configure() method, I used the Auth configuration and the CORS “default” configuration that I defined earlier. Kindly note that using authentication in the request pipeline is before using MVC.
Running the solution
First, Run the solution with multiple startup projects. You can enable that on Solution’s Properties > Common Properties > Startup Project
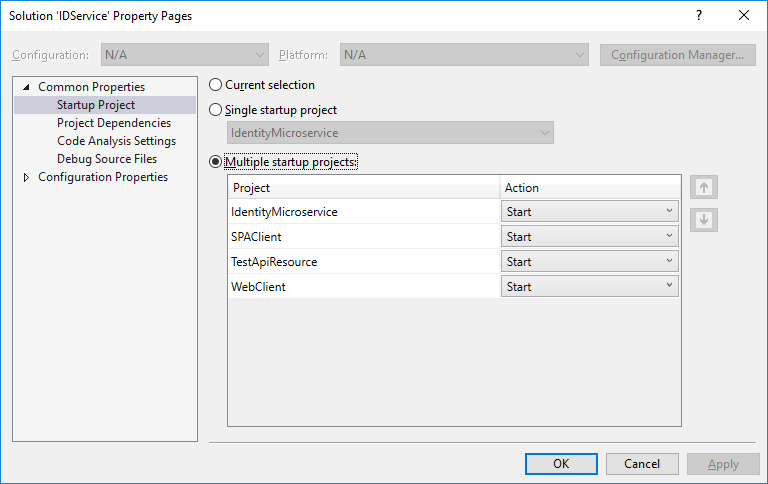
You better set the Identity Microservice project on top of the list.
When you clone the repo, you will get launchsettings.json file for each project. This file is usually ignored and not included in the repo.
I included launchsettings.json to keep using the same ports for each project that are used in config.cs file. The used ports are like the following:
- Identity Microservice at port 5000
- Test Api Resource at port 5001
- Web Client at port 5002
- SPA Client at port 5003
Now you can run the solution, you can use the test user data that are seeded already from SeedData.cs to the SQLite database that is used for storing users’ data.
Credits
I mainly depended on IdentityServer4 documentation to write this article. Another good resource is securing .net microservice. I would like also to mention that I learned a lot from courses like:
- Introduction to OAuth2, OpenID Connect and JSON Web Tokens (JWT) by Dominick Baier at PLURALSIGHT
Try the steps I mentioned in this post and tell me in a comment below
- What do you think about using IdentityServer4 with ASP.Net Identity?
- What other choices do you use for Authentication in your application?
Icons used on this page https://icons8.com
New Comment