Using loops and dynamic SQL in SQL Server
| Create Date: December 29, 2020 at 08:50 PM | Tag: SQL | Author Name: Sun, Charles |
An example for using loops and dynamic SQL in SQL Server. The example for parsing the field with value like ‘5,8,58-65,88,98-108’ for geting sequence like ‘5,8,58,59,60…….’.
if object_id('tempdb..#ids') is not null drop table #ids
create table #ids
(
	ID int
)

declare @ids varchar(max) = '',
@sql varchar(max),
 @original varchar(max),
 @temp varchar(20),
  @lidx int,
 @ridx int

 declare config_cursor cursor for
select distinct Value from table

open config_cursor
fetch next from config_cursor
into @original

while @@FETCH_STATUS = 0
begin
 while len(@original) > 0
 begin
	if @original like '%,%'
	begin
		set @temp = left(@original, charindex(',', @original))
		set @original = right(@original, len(@original) - charindex(',', @original))
	end
	else
	begin
		set @temp = @original
		set @original = ''
	end
	if @temp like '%-%'
		begin
			set @lidx = cast(left(@temp,  charindex('-', @temp) - 1) as int)
			set @ridx = cast(substring(@temp, charindex('-', @temp) + 1, len(@temp) -  charindex('-', @temp) - iif(@temp like '%,', 1, 0)) as int)
			declare @newTemp varchar(max) = ''

			while @lidx <= @ridx
				begin
					set @newTemp = @newTemp + cast(@lidx as varchar(5)) + ','
					set @lidx = @lidx + 1
				end
			set @ids = @ids + @newTemp

		end
	else
	begin
		if @temp like '%,'
			set @ids = @ids + @temp
		else
			set @ids = @ids + @temp + ','
	end
	print @ids
 end
  	set @sql = 'insert into #ids select ID from table where ID in (' + left(@ids, len(@ids) - 1) + ')'
	exec(@sql)

	fetch next from config_cursor
	into @original
end
close config_cursor
deallocate config_cursor
New Comment
Set up mysql on ubuntu
| Create Date: October 27, 2020 at 11:20 PM | Tag: MYSQL | Author Name: Sun, Charles |
How To Install MySQL on Ubuntu 20.04
sudo apt update
sudo apt install mysql-server
//configure
sudo mysql_secure_installation

sudo mysql (mysql -u root -p)
mysql> CREATE USER 'sammy'@'localhost' IDENTIFIED BY 'password';
mysql> GRANT CREATE, ALTER, DROP, INSERT, UPDATE, DELETE, SELECT, REFERENCES, RELOAD on *.* TO 'sammy'@'localhost' WITH GRANT OPTION;
mysql> FLUSH PRIVILEGES;
mysql> exit

mysql -u sammy -p
How To Install and Secure phpMyAdmin on Ubuntu 20.04
sudo apt update
sudo apt install phpmyadmin php-mbstring php-zip php-gd php-json php-curl
Note: Assuming you installed MySQL by following Step 2 of the prerequisite LAMP stack tutorial, you may have decided to enable the Validate Password plugin. As of this writing, enabling this component will trigger an error when you attempt to set a password for the phpmyadmin user:
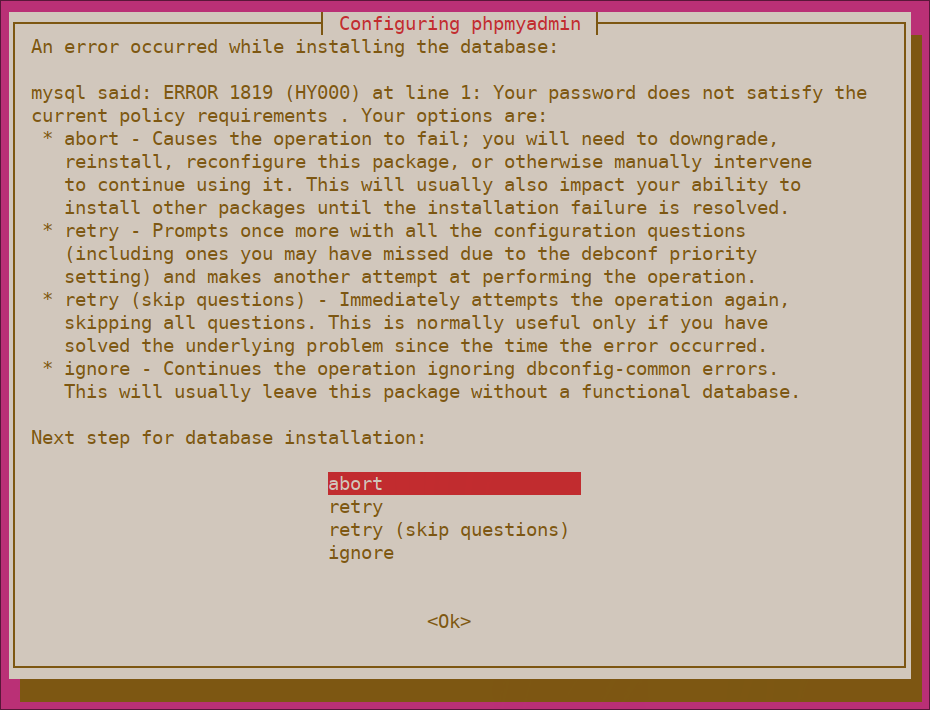
To resolve this, select the abort option to stop the installation process. Then, open up your MySQL prompt:
sudo mysql
Or, if you enabled password authentication for the root MySQL user, run this command and then enter your password when prompted:
mysql -u root -p
From the prompt, run the following command to disable the Validate Password component. Note that this won’t actually uninstall it, but just stop the component from being loaded on your MySQL server:
UNINSTALL COMPONENT "file://component_validate_password";
Following that, you can close the MySQL client:
exit
Then try installing the phpmyadmin package again and it will work as expected:
sudo apt install phpmyadmin
Once phpMyAdmin is installed, you can open the MySQL prompt once again with sudo mysql or mysql -u root -p and then run the following command to re-enable the Validate Password component:
INSTALL COMPONENT "file://component_validate_password";
he installation process adds the phpMyAdmin Apache configuration file into the /etc/apache2/conf-enabled/ directory, where it is read automatically. To finish configuring Apache and PHP to work with phpMyAdmin, the only remaining task in this section of the tutorial is to is explicitly enable the mbstring PHP extension, which you can do by typing:
sudo phpenmod mbstring
Afterwards, restart Apache for your changes to be recognized:
sudo systemctl restart apache2
phpMyAdmin is now installed and configured to work with Apache. However, before you can log in and begin interacting with your MySQL databases, you will need to ensure that your MySQL users have the privileges required for interacting with the program.
Configuring Password Access for a Dedicated MySQL User
Alternatively, some may find that it better suits their workflow to connect to phpMyAdmin with a dedicated user. To do this, open up the MySQL shell once again:
sudo mysql
If you have password authentication enabled for your root user, as described in the previous section, you will need to run the following command and enter your password when prompted in order to connect:
mysql -u root -p
From there, create a new user and give it a strong password:
CREATE USER 'sammy'@'localhost' IDENTIFIED WITH caching_sha2_password BY 'password';
Note: Again, depending on what version of PHP you have installed, you may want to set your new user to authenticate with mysql_native_password instead of caching_sha2_password:
ALTER USER 'sammy'@'localhost' IDENTIFIED WITH mysql_native_password BY 'password';
Then, grant your new user appropriate privileges. For example, you could grant the user privileges to all tables within the database, as well as the power to add, change, and remove user privileges, with this command:
GRANT ALL PRIVILEGES ON *.* TO 'sammy'@'localhost' WITH GRANT OPTION;
Following that, exit the MySQL shell:
exit
You can now access the web interface by visiting your server’s domain name or public IP address followed by /phpmyadmin:
https://your_domain_or_IP/phpmyadmin

localhost/phpmyadmin
I can't access http://localhost/phpmyadmin/
what you need to do is to add phpmyadmin to the apache configuration:
sudo nano /etc/apache2/apache2.conf
Add the phpmyadmin config to the file:
Include /etc/phpmyadmin/apache.conf
then restart apache:
sudo service apache2 restart
On windows, I think you can just navigate to the apache2 config file and include the phpmyadmin config file as shown above, then restart apache
http://localhost:80/phpmyadmin/ New Comment
Useful SQL tips
| Create Date: August 26, 2020 at 07:19 PM | Tag: SQL | Author Name: Sun, Charles |
Always use the OUTPUT clause of the DELETE statement to fill the audit table. While small, there is a chance that the data changes between the INSERT statement and DELETE, which means you’re not capturing the original data before deleting it.
DELETE FROM
OUTPUT DELETED.*, GETDATE() INTO
WHERE...
How to use table variable in a dynamic sql statement?
Your EXEC executes in a different context, therefore it is not aware of any variables that have been declared in your original context. You should be able to use a temp table instead of a table variable as shown in the simple demo below.
create table #t (id int)
declare @value nchar(1)
set @value = N'1'
declare @sql nvarchar(max)
set @sql = N'insert into #t (id) values (' + @value + N')'
exec (@sql)
select * from #t
drop table #t
On SQL Server 2008+ it is possible to use Table Valued Parameters to pass in a table variable to a dynamic SQL statement as long as you don't need to update the values in the table itself.
So from the code you posted you could use this approach for @TSku but not for @RelPro
Example syntax below.
CREATE TYPE MyTable AS TABLE
(
Foo int,
Bar int
);
GO
DECLARE @T AS MyTable;
INSERT INTO @T VALUES (1,2), (2,3)
SELECT *,
sys.fn_PhysLocFormatter(%%physloc%%) AS [physloc]
FROM @T
EXEC sp_executesql
N'SELECT *,
sys.fn_PhysLocFormatter(%%physloc%%) AS [physloc]
FROM @T',
N'@T MyTable READONLY',
@T=@T
The physloc column is included just to demonstrate that the table variable referenced in the child scope is definitely the same one as the outer scope rather than a copy.
Probably not a lot of space savings, as the data is stored only at the length that it needs (hence the “var” part of the data type name), but the DB engine does use max lengths to determine page usage, which gets less optimal as the row gets longer…
SET @sql = 'CREATE TABLE ' + @backup_table_name + ' (';
SELECT @sql = @sql + c.column_name + ' ' +
CASE WHEN data_type = 'timestamp' THEN 'varbinary(8)'
WHEN data_type in ('char','varchar',...) THEN data_type + '(' + character_length + ')'
-- others if needed
ELSE data_type
END + ', ' -- we don't need (or really want) any other column attributes like NOT NULL...
FROM INFORMATION_SCHEMA.COLUMNS
WHERE TABLE_NAME = @table_name
ORDER BY ORDINAL_POSITION
SET @sql = left(@sql, len(@sql) - 1) + ', run_date datetime);'
DELETE FROM table
OUTPUT DELETED.*, GETDATE() into
WHERE...
SQL Server: combining multiple rows into one row
You can achieve this is to combine For XML Path and STUFF as follows:
SELECT (STUFF((
SELECT ', ' + StringValue
FROM Jira.customfieldvalue
WHERE CUSTOMFIELD = 12534
AND ISSUE = 19602
FOR XML PATH('')
), 1, 2, '')
) AS StringValue
There are several methods.
If you want just the consolidated string value returned, this is a good quick and easy approach
DECLARE @combinedString VARCHAR(MAX)
SELECT @combinedString = COALESCE(@combinedString + ', ', '') + stringvalue
FROM jira.customfieldValue
WHERE customfield = 12534
AND ISSUE = 19602
SELECT @combinedString as StringValue
Which will return your combined string.
You can also try one of the XML methods e.g.
SELECT DISTINCT Issue, Customfield, StringValues
FROM Jira.customfieldvalue v1
CROSS APPLY ( SELECT StringValues + ','
FROM jira.customfieldvalue v2
WHERE v2.Customfield = v1.Customfield
AND v2.Issue = v1.issue
ORDER BY ID
FOR XML PATH('') ) D ( StringValues )
WHERE customfield = 12534
AND ISSUE = 19602
How to check existence of user-define table type in SQL Server 2008?
You can look in sys.types or use TYPE_ID:
IF TYPE_ID(N'MyType') IS NULL ...
Just a precaution: using type_id won't verify that the type is a table type--just that a type by that name exists. Otherwise gbn's query is probably better.
IF EXISTS(SELECT 1 FROM sys.types WHERE name = 'Person' AND is_table_type = 1 AND SCHEMA_ID('VAB') = schema_id)
DROP TYPE VAB.Person;
go
CREATE TYPE VAB.Person AS TABLE
( PersonID INT
,FirstName VARCHAR(255)
,MiddleName VARCHAR(255)
,LastName VARCHAR(255)
,PreferredName VARCHAR(255)
);
New Comment